https://squatsandrunningstitches.com/blogs/news.atomSquats & Running Stitches Co. - News2024-09-20T12:19:22-06:00Squats & Running Stitches Co.https://squatsandrunningstitches.com/blogs/news/diy-quick-and-easy-30-minutes-or-less-clutch-wallet2024-09-20T12:19:22-06:002024-09-20T12:36:31-06:00DIY: Quick and Easy 30 minutes or less phone & wallet clutchSummer Davis
Need a quick project? This video takes you through the steps of creating a phone and wallet clutch!
The anatomy of the phone wallet clutch
Fabric Requirements: 8” wide x 7” tall interior lining piece 8” wide x 7” tall exterior piece 8” wide x 13 1/2” tall pocket piece.
Or you can use one single piece of fabric 8” x 26 1/2” if you want all the fabrics to be the same.
7 1/2” wide x 26” tall stabilizer piece.
I used craft fuse 808, but for a less structured clutch use sf101.
Additional supplies: thread, swinging machine, clips, marker, kam press, & kam snaps.
]]>
https://squatsandrunningstitches.com/blogs/news/simple-ruffle-pillowcase2024-09-14T11:27:11-06:002024-09-14T11:29:27-06:00Simple 30 Minute Ruffled Edge PillowcaseSummer Davis
Create a simple ruffled pillow case:
Notes:
Width of fabric is assumed to be 42” or more.
Basic sewing knowledge is expected.
Both a straight and zig zag stitch is used.
Use the following fabric requirements for the different pillow sizes.
Standard size pillow case (shown in video)
1 yard of fabric
- cut (2) 21” x 28” rectangles
- cut (2) 4” x 42” strips
Queen - 1 1/4 yards of fabric
- cut (2) 21” x 32” rectangles
- cut (2) 4” x 42” strips
King - 1 1/3 yards of fabric
- cut (2) 21” x 38” rectangles
- cut (2) 4” x 42” strips
1st mark a 1/4” line on the lengthwise of the 4”x42” strips.
Use this line to create a 1/4” hem by folding your fabric wrong sides together, then repeating one time.
Sew a topstitch on your hem.
Repeat on the other 4” x 42” strip to create (2) hemmed strips.
Create the ruffled edge by creating a basting stitch 3/8” from the remaining raw edge of the strip using the highest stitch length your machine allows. Before stitching be sure to pull up your bottom tail and top thread tail and pull them so they are long. DO NOT BACKSTITCH. Leave the top and bottom tail threads long when you end the stitch too. You need these to create the ruffle.
Do this on both strips.
Now create the ruffles. I prefer to pin my ruffle edge to my pillow case front (right sides facing together)and adjusting my ruffle to size that way. You can also adjust your ruffle to 21” and then pin to your pillow case front right sides facing together. I place my pins about 1” from the raw edge parallel to the edge, so I can leave them in when I sew.
Stitch the ruffle to the pillowcase front using a length of 2.0 mm and a 1/2” seam allowance. Make sure to backstitch at the top and bottom of the ruffle.
Leave the stitch you just made alone, but remove the basting stitch you made to create the ruffle.
Zig zag stitch or overlock the raw edge of the pillowcase and ruffle you just created.
Repeat with the other pillowcase and ruffle strip.
Create the pillow case by facing the pillow fronts right sides together. Pin the pillow case on the corners, where the ruffle seam matches and along the edge of the pillow case to prevent the fabrics from moving. Starting at the corner of one of the ruffles, sew a 1/2” seam allowance around each side excluding the ruffled edge. Remove needles as you see if they are in your needle path. Be sure to back stitch at both the beginning and end of the pillowcase.
Zig zag stitch or overlock the raw edges of the pillowcase excluding the ruffled edge.
Flip your pillowcase right side out, add a pillow and enjoy!
]]>
https://squatsandrunningstitches.com/blogs/news/english-paper-piecing-clock-tutorial-for-beginners2024-07-12T00:51:24-06:002024-07-12T00:52:00-06:00English Paper Piecing Clock Tutorial for BeginnersSummer Davis
Looking for a fun and easy english paper piecing project?
Well I have you covered. The EPP hexagon flower only takes a few hours to create and the clock about an hour.
English paper piecing is a traditional quilting technique that involves hand-sewing fabric pieces around paper templates to create intricate designs. EPP is great for travelling or watching a movie because you don't need a sewing machine. In this blog post, we will explore how to apply this technique to create a unique and beautiful clock design.
Pattern Level = Beginner friendly.
Sewist has successfully basted and sewn hexies using a whip stich before. Need a refresher? Here's a tutorial. Click here.
What materials do you need?
- Thread
- Needle
- Scissors
- Glue Stick (for glue basting)
- 1" hexagon papers (19 total)
- 10" x 10" Blank wood panel (this is the one I used. Click here.)
- Clock kit ( this is like the one I used in mine. Click here.)
*If you are picking up supplies in store and clock kits aren't available another option is to take the clock components out of a different clock. That is what I actually did. I used this one click here.
- Drill and drill bit that is slightly larger than your clock machine shaft - Sand paper (optional) - Staple gun + staples - Project coordinating ribbon - Hot glue gun + glue stick - (1) AA battery or whatever is required by your clock kit.
Fabric Requirements
- 1 FQ for the background & second circle of hexagons.
- cut out (1) 12 1/2" square & (6) 2 1/2" squares
- (13) 2 1/2" squares for the colored exterior ring. I chose to fussy cut my fabrics and do a rainbow assortment since they will act as the clock numbers 1-12, and the 13th will by the center of the clock face.
Assembling the clock design
1. Baste all (19) hexagons using preferred method.
2. Determine layout.
3. On the back of your hexagons, on the papers, mark your hexagons (1-12) like a clock face with number 12 at the top like shown. Mark the center as 13.
4. Begin with your 13th hexagon, sew each of your (6) background hexagons to each side using a whip stitch. Sew each of your background hexagons to one another.
5. Starting with hexagon 1, sew your colored hexagons to your background hexagons. Sew them in the order 1-12 to ensure they stay in the proper order. Sew each of the colored hexagons to its neighboring hexagon, so all the hexagons are connected.
Don't forget to tag me when you post your #HexieFlowerClock @squats_and_runningstitches . If you'd like a printable copy click here.
]]>
https://squatsandrunningstitches.com/blogs/news/easy-video-guide-to-glue-basting-your-quilt-quick-simple-step-by-step-video-tutorial2024-04-03T11:45:06-06:002024-04-03T11:45:06-06:00Easy Video Guide to Glue Basting Your Quilt - Quick & Simple Step by Step Video TutorialSummer Davis
Easy Video Guide to Glue Basting Your Quilt
(pictured is my Base Camp Quilt Pattern available by clicking here.)
Supplies
Quilt top - I highly suggest using a whole cloth top ( fabric that is not pieced).
Batting - a piece of natural fiber batting that is 2-4" larger than the quilt top on each side. You can definitely cut it closer like I did in the picture, but if you aren't experienced at basting I recommend giving yourself that safety net.
Backing - a piece that is the same size or slightly larger than your batting.
Washable Elmers Glue - It is very important to make sure before basting that the glue you are using is clearly labeled as washable. This is the type I use.
I have two or three bottles that I refill using the gallon jugs of washable Elmers glue that go on sale during the school year. I use about 1/2 a 4 oz glue bottle/throw quilt.
Painters tape - You will need this to tape down your quilt backing. I use the blue Scotch brand 2" tape.
Why Elmer's Glue Basting?
I started using Elmer's glue to baste my binding in 2019 using the Sharon Schambers method. My results were amazing and it was a gentle introduction to using washable Elmer's glue during quilting. In March of 2020, I basted my first whole cloth quilt using washable Elmer's glue. I am sure you are asking yourself, why glue basting when there are other options like pin basting and spray basting? Well let's talk about my experience with both. I had pin basted maybe 5 quilts with mostly poor results. I had puckers and just felt defeated each time after using the method. Plus, my delicate fingers were sore as heck each time. Then quilting around the pins was the annoying cherry on top of my mountain of frustration. I then learned about spray basting and thought I had found my perfect solution. Welp, since things are never that easy, I quickly learned that even after following manufacturers guidelines, every time I used spray baste I ended up with a horrible headache that lasted days. I had amazing results though and no puckers, so if I could use the washable Elmer's glue I already use during binding to replicate the adhesion of spray basting then that seemed like a perfect alternative for me. Here is a picture of the first whole cloth I ever basted and free motion quilted.
How Do I Glue Baste?
I glue baste by applying the glue in a grid like pattern (about 4"-6") between the parallel horizontal lines and vertical lines. Here's a video that shows how I do it. The quilt pattern in the video is my "Stars in Court" pattern and is a freebie when you sign up for my newsletter. You can sign up here.
Here's a quick bullet point explanation if you'd like a quick run down.
1 - tape down the backing, so it can’t move or slip.
2 - layout and smooth the batting on top of the backing.
3 - pull the batting up to expose 1/2 of the backing.
4- apply glue in a 4”-6” grid like pattern on half of the exposed section.
5 - pull the batting taut over the glue grid that was created then rub and smooth the batting onto the backing.
6 - repeat the glue grid on the remaining half of the backing and pull over the batting and repeat as in step 5.
7 - repeat on the opposite side of the batting until the entire batting has been basted into the backing.
8 - using the same method glue baste the quilt top working in sections.
9 - allow the basted quilt sandwich to dry overnight or heat set the quilt using your iron.
10 - quilt and bind as desired.
11 - wash the quilt using a pre-soak, extra wash and using warm water. Here are the cleaning directions per manufacturer.
12 - check for obvious glue spots and if none are apparent you can dry the quilt. If there are apparent glue spots repeat step 11.
Final Remarks
1 - try this method on a pillow top or whole cloth quilt before trying it on a pieced quilt. Work your way up to larger sizes starting with small wall hangings and building to bed sized quilts.
2 - let the quilt air dry in place for an hour before moving to ensure no movement in the quilt sandwich.
3 - mop and vacuum your basting spot prior to basting. Mop your basting spot after basting.
4 - clean your glue nozzle and make sure nothing is plugging it. If you are having a hard time getting glue out that’s probably the reason.
5. This method can be used while table or wall basting using the same concept.
Information: I have been glue basting while quilting since 2019 and have never noticed gumming of my needle or glue transfer onto my machine. ONLY use the glue labeled “washable Elmer’s glue”. This glue is a PVA (polyvinyl acetate) and the carboxyl groups make it high soluble in water (that means it washes out in water). I take no responsibility for any quilts you deem ruined while using this method. This is a method I have taken years to perfect and it’s ultimately up to you to execute your best judgement and proceed with caution. I didn’t make up this method, I use the Sharon Schambers binding tutorial and I had seen someone else glue baste, using a different method, on Instagram. After that a quick google search showed forums talking about glue basting as early as 2011. Any other questions or comments are welcome below.
]]>
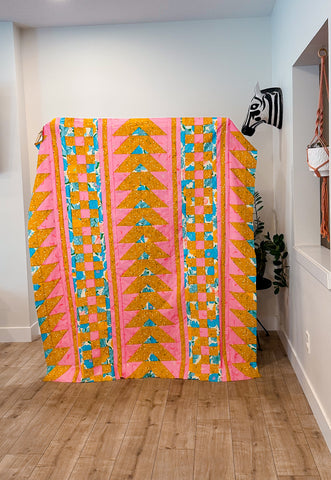
https://squatsandrunningstitches.com/blogs/news/base-camp-quilt2024-02-29T13:12:47-07:002024-02-29T19:39:35-07:00Meet the Base Camp QuiltSummer Davis
Meet the Base Camp Quilt!
The Base Camp quilt was designed with the consideration of things you might see or experience on a camping trip. The centered triangles appear as interlocking mountain ranges or as a row of tents, the vertical lines represent trails you might walk that are near your campsite, the checkered blocks represent the cozy checkered fabrics that we often see in cabins or sleeping bags, and the exterior triangles represent trees.
When I was deciding on what fabrics to use for this quilt, I knew I wanted to make a happy yellow one. For some reason when I think of camping, I think about waking up early as the sun warms and brightens your tent. For the yellow version I completed the "baby" size (39 1/2" x 39 1/2") and I used the Art Gallery Pure Solids Fabrics: Creme de la Creme, Empire Yellow, & Lemon Tart. The quilt backing is also Lemon Tart. I affectionately termed this quilt "YellowStone" mostly because it's yellow and of course after the national park.
After I made the yellow version, with Valentine's Day coming up I was heavily inspired to use the colors of "love". I used the Kona Cotton fabrics: candy pink, dragon fruit, and chili. I decided to do the "full" sized quilt to test the pattern and referred to this quilt as "Red Mountain". Red mountain pass is a stunning and nerve wracking pass we often travel to visit our favorite mountain town Ouray. The quilt is bold and in your face, much like the lack of guard rails on the pass and the sheer edge of the cliff. For the backing and pillow case I used Robert Kaufman gingham check fabric. I straight line quilted this at 1 1/2" vertical lines on my Bernina 570.
The last version I personally made is the "Rocky Mountain" version. Some of my favorite fabrics to use for any pattern are Art Gallery Pure Solids Northern Waters, and Raw Gold. I usually use Ocean Fog with these two, but decided to use Mediterraneo to make the quilt darker. I decided to do a Queen sample this time, so the quilt can live on our queen bed in our camper. Anyone whose ever made a bed quilt knows it is a labor of love and a labor on the shoulders. I straight line quilted it on my Bernina 570. I quilted every 1 3/4" interval vertically. For the backing I used Art Gallery Fabric "Evergreens Dusk, Trees in Twilight". For the binding I used Northern Waters.
For the coordinating pillowcases I used mediterraneo, northern waters, and raw gold.
First up is the version my friend Mary Anna (@MarvelousAuntieM) made. She used the Kona Cotton fabrics Celestial, Ivory, and Fog appropriately reffered to as the "Everest" version. She completed this beautiful quilt in her home in Grand Junction and was assisted by her dog, Tank. She had the quilt longarmed by Shannon (@hellomynameisquilt).
Amy always packs a punch with her tests because of her unique use of prints and love of Ruby Star Society fabrics. Amy completed her test in her home in Canada. Amy used the following fabrics for her version: Twirl in June, Plus in Cactus, and Flowerland floral in Turquoise.
The next version is from my favorite mother and daughter run fabric shop, Mary and Emily from @rosiegirlquilting . Emily pieced a beautiful throw sized version using gorgeous yarn dyed fabrics from Diamond Textiles. Their version has a kit available on their website, click here.
Elysha from @quiltblocked was the absolute kindest volunteer tester. She showed up in my instagram messages on superbowl day and offered to test the pattern! She made an all "Starry" by Ruby Star Society version. Here's the mock up and a peek of her version.
Kacey was the technical editor for the pattern. Kacey is a talented quilter and a thorough technical editor. She can be found on instagram @KaceyCrutch .
Scheis Anderson
My husband who never complains about holding quilts in strange places and never asks why I have a new quilt top, but the house is a mess.
]]>
https://squatsandrunningstitches.com/blogs/news/how-to-create-a-quilt-inspired-gallery-wall-in-your-home2023-04-12T08:39:17-06:002023-04-12T08:39:17-06:00How to Create a Quilt Inspired Gallery Wall in Your HomeSummer Davis
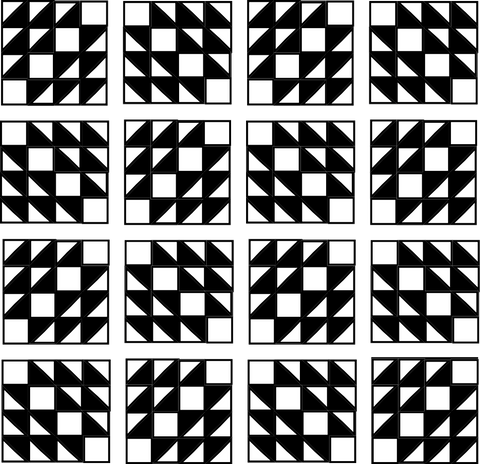
I am back today with a super fun tutorial on how I created a Quilt block inspired wall gallery. I created my own prints; which are available for free to download here: Set of 12 Traditional Quilt Blocks For 8"x10" Digital Art Prints or if you want to create your own feel free too!
To download the files from the zipped file you will need to save the zipped file and then click extract all on the folder icon and follow the prompts from your computer.
To begin with, I created a total of 12 of my favorite traditional quilt blocks using graphic design software. Here is a snapshot of the blocks that I created and are included.
I saved these as jpegs and then I scoped out the cheapest place to get the pictures printed. I ended up going with Wal Greens who often has a 50% off all prints promo, so it cost me about $2/print and a grand total of about $25 dollars after tax. I also chose same day pickup, since waiting isn't my strong suit.
For the picture frames, I scoped out Amazon and Walmart for what my cheapest options would be. Although for a much eclectic look, I suggest going to your local thrift stores and looking for 8" x 10" frames. I ended up going with these in black because they had 12 in stock at my local Wal Mart. I paid about $2.50/frame for a total of about $30.
After I picked the frames and prints up, I loaded the prints into the picture frames and hung them. The hanging specifics I describe will be specific to the frames above; which are the ones I used.
For hanging, I decided where I wanted to start my top middle of my gallery wall. I marked that spot, and then I measured over 13" to both my right and left making sure to stay level. I marked both spots. (This distance, with these frames creates a 5" gap between pictures.) I used push pins, these ones,
to hang the pictures, which worked fine, but you could use an alternative method.
To hang my middle row, I measured over 4" from each picture to find the center and down 5 3/4" down and marked each spot. I did this for the three pictures in the middle row and then continued this strategy for the last row. If you are doing all 12 prints you will have to decide whether you want to do 3 columns by 4 rows or 4 columns by 3 rows and adjust.
Then ta-daaaa I now have the cutest little quilt block art gallery wall and after it was all said and done only cost about $60 total.
]]>
https://squatsandrunningstitches.com/blogs/news/plaid-sawtooth-stocking-tutorial2021-11-19T12:48:41-07:002024-10-24T10:27:32-06:00Plaid & Sawtooth Stocking TutorialSummer Davis
It is assumed you have basic knowledge of sewing/quilting.
Use a Scant 1/4" seam to piece the stocking quilt tops.
RST = Right sides together.
HST= Half-square triangle
WST= Wrong sides together
FQ = Fat quarter
Basic Sewing Supplies Needed:
-Sewing machine
- thread
- rotary cutter
-cutting mat
-6"x24" ruler
-iron and ironing board
Sawtooth Star Stocking Directions
Plaid Stocking Directions
Tip: Cut out the interior of your stocking template so you can easily frame the elements of the stocking.
Head to Suzy Quilts Blog to see finishing instructions for your quilted stockings by going to Part 3: Cut Your Stocking Pieces.
]]>
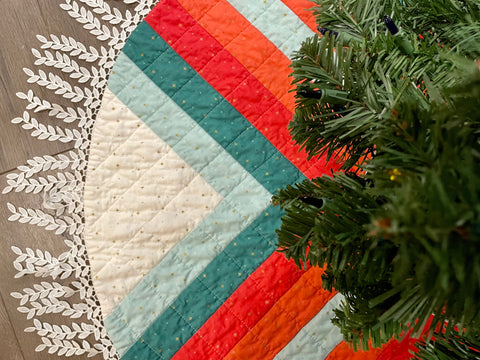
https://squatsandrunningstitches.com/blogs/news/a-sparkler-christmas2021-11-10T11:02:28-07:002021-11-10T11:07:37-07:00A Sparkler ChristmasSummer Davis
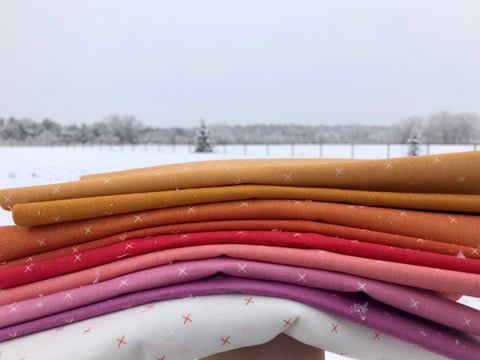
When I saw Riley Blake's new basics line, Sparkler, by Melissa Mortenson, I knew it was the line I wanted to do our new holiday decorations in. The fabrics have the cutest gold pluses throughout. The placement of the pluses feel random, similar to the way snowflakes fall from the sky. Check out the cute tiny details and the different fabric colorsbelow.
Since my project is for winter holidays, I chose to go with greens, aqua, reds, oranges, pinks, and white for my palette. The specific colors I used from the Sparkler line for my stockings are Jade, Songbird, Cayenne, Apricot, and white. Check out the stockings below.
For the tree skirt, I used the same colors, but also added the Sparkler fabric rouge to the mix. I also couldn't help myself and added a little flair!
Want to add trim to your next quilt? Here's the SuzyQuilts tutorial I used!
So if you are in the market for a fabric line, that feels like Christmas, but also modern. Check out the Sparkler fabric line by Melissa Mortenson for Riley Blake Designs. Keep Scrolling to see detailed pictures of the tree skirt and stockings.
For the backing, I used Kisses fabric by Riley Blake Designs in rose gold, so if we ever decide to do a "white" Christmas a flip of the skirt is all that's needed!
]]>
https://squatsandrunningstitches.com/blogs/news/entropy-scrap-along-week-9-oct-17-23-catch-up-week-piece-rows2021-10-18T10:30:49-06:002021-10-18T10:30:50-06:00Entropy Scrap Along Week 9: Oct 17-23 Catch up week/ Piece RowsSummer Davis
Eeeeks! We are basically done! We just need to piece the blocks into rows this week and then piece those rows together. If you aren't at that point yet and are still working on block construction that's okay! Finish piecing your blocks and then piece your rows and quilt top next week! Row piecing goes quite quickly; so there is still time to catch up!
Lets talk about layout!
1. Starting in the top left corner, lay out the blocks as shown in the diagram below making sure you have an HST in the upper left corner.
2. Continue laying out the blocks as seen by rotating every other block as shown in the layout.
3. Sew the blocks together to construct one row at a time. Press seams open.
Set aside for week 10, or if you want to finish now, go ahead by sewing rows together and press seams open.
Don't forget to save a picture to share week 10!
]]>
https://squatsandrunningstitches.com/blogs/news/quick-easy-fall-quilt2021-10-14T07:10:36-06:002021-10-14T09:18:45-06:00A Quick, Easy and Modern Fall QuiltSummer Davis
Looking for a quick, modern quilt to whip up for your lap or your wall for fall? Well look no further because I've got you covered with my Nomad Quilt! The pattern itself has an modern boho feel and the added fringe detail and bamboo batting really lets it shine in autumnal colors!
First, I gathered some Cotton Confetti Fall colored Fabrics from Riley Blake Designs. From left to right the colors are the following: butterscotch, pumpkin, and putty! Putty is a nice off white that has a tiny touch of beige in the color, so it emits warmer tone than a bright white!
After receiving the fabrics, I knew doing a two tone version of my Nomad Quilt that can be purchased here, would be perfect! I cut my templates, cut my fabrics and began sewing! This is my 4th or fifth Nomad quilt, so it only took me a few hours before my top was finished.
Instead of doing the bare minimum of quilting, I decided to spend a little extra time on the quilting, since I had plenty to spare since construction was so fast. I used the solid Confetti Cotton Butterscotch for the backing and Pellon 50/50 Bamboo & Cotton batting. I used my elmers glue basting technique to baste the quilt. When I had posted my Elmers glue basting method, people were curious how it works on bamboo blend batting’s and after a few bamboo batted quilts I can officially say wonderful! But now back to the quilting! I decided to do a combination of diagonal and grid quilting.
After it was quilted, I knew that adding a little extra flair would compliment this Fall Nomad Quilt. I had found some fringe at my local grocery store that I knew could take the boho of this quilt to the next level. I used the same method as the Suzy Quilts Pom-Pom tutorial to attach my fringe to my binding.
I attached the fringe binding using a machine and here’s the final quilt before washing!
And can you believe it got even better after washing?! The crinkle of the quilt and the drape of the bamboo batting are what my quilty dreams are made of! Check it out below!!! And what fall quilt would be complete without a photo shoot in fall foliage?
Oh
Now that's what I call TEXTURE!
]]>
https://squatsandrunningstitches.com/blogs/news/entropy-scrap-along-week-6-sept-26-oct-2-layout-and-chain-piecing-blocks2021-09-26T14:08:21-06:002021-10-07T09:16:24-06:00Entropy Scrap Along Week 6-8 (Sept. 26-Oct. 16): Layout and Piecing BlockSummer Davis
Yay! If you made it through trimming put your hand in the air because a virtual high five is flying your way!
We finally get to layout our pieces, decide on a layout and start piecing blocks. Lets discuss how to make an Entropy quilt block again. We need (4) 4.5" squares and (12) 4.5" half square triangles. We have two layout options, "Normal" and "Inverse". The difference between the two is that for the Inverse, as seen below you start with the HST side that has color oriented outwards with the background color oriented inward.
If you are working from the pattern and not doing a scrappy version you can skip ahead to the "Piecing Blocks Section".
Scrappy Version Layout
So you decided to do a scrappy version, or a version I suggested in the, "Precuts and Cutting" blog post. Head back to that post to see how the the colors are laid out after reading this post. I will go over just a few layout options to show the basics of constructions here.
For the scrappy "normal" version, if you chose to do a rainbow with your scraps, I recommend laying out your HSTs in order of ROYGBIV + BW (Red, Orange, Yellow, Green, Blue, Indigo, Violet, Black and white). This way you can construct blocks by color like below. Set blocks into piles of (12) 45." HSTs and (4) 4.5" squares. Here are examples of Violet/indigo , blue, green and yellow blocks.
If you have more than 12 purple/indigo HSTS, that is fine you can still use them. I recommend using a few blocks of indigo and switching them into the blocks next to or below it, so it has a better flow. The same with the rest of the colors. You can distribute the colors and mix and match.
Here's an example of a mocked up scrappy rainbow entropy quilt.
Inverse Ombre Fat Quarter Version
For the Inverse Ombre Fat Quarter version you will construct each color as its own separate entropy block for colors A-P. For example, the layout will look like this. The colored side of the HST will start in the upper corner and the squares will be the same color.
Fat Eighth/Quarter "Normal" Ombre Version
You will orient your background towards the top left corner and your squares will also be the same color as your background fabrics.
Layout Tips
Use a large piece of batting tacked to a wall to layout your blocks like pictured. I literally used tacs and pushed them through the batting and wall to hold it up.
Piecing Normal Entropy Blocks
As you can see, for a normal block you will orient your background towards the upper left corner and lay the blocks out as pictured below.
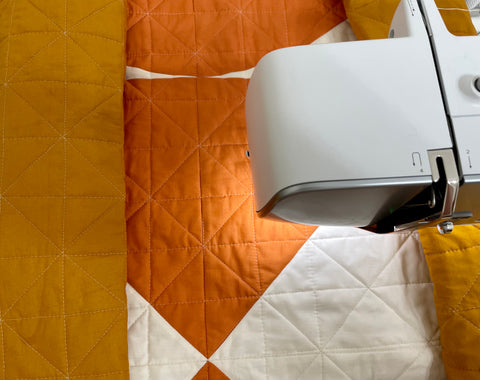
Sew the units together in columns as pictured below. I prefer to press seams open, but you can press to preference. Then sew the columns together and press seams open or to your preference again.
Note: To piece these, I prefer to switch out my 1/4" presser foot for my walking foot that has a 1/4" marking. Why? Because of how seams run diagonally on HSTs, using my walking feet and a dual feed allows for quick piecing and less issues getting hung up/tugging on seams.
Piecing InverseEntropy Blocks
As you can see, for a inverse block you will orient your colored part of the half square triangle towards the upper left corner and lay the blocks out as pictured below.
Sew the units together in columns as pictured below. I prefer to press seams open, but you can press to preference. Then sew the columns together and press seams open or to your preference again. Blocks should measure 16.5" x16.5".
NOTE: To piece these, I prefer to switch out my 1/4" presser foot for my walking foot that has a 1/4" marking. Why? Because of how seams run diagonally on HSTs, using my walking feet and a dual feed allows for quick piecing and less issues getting hung up/tugging on seams.
]]>
https://squatsandrunningstitches.com/blogs/news/simple-patchwork-quilt-with-pom-pom-binding2021-09-12T15:58:28-06:002021-09-13T13:16:26-06:00Simple Patchwork Quilt with Pom Pom BindingSummer Davis
Simple Patchwork Quilt with Pom Pom Binding
Ever feel like making something simple for a gift, yourself or to break out of a lost sewjo rut?
I was really struggling a few months ago. I love quilting for the monotony, but also sometimes despise quilting because of the monotony. Usually to get out of a rut I organize my stash, but that wasn't cutting it. Cue the Community fabrics by Citrus & Mint Designs for Riley Blake I had received a while ago and just couldn't come up with the right design for.
Sometimes the lack of indecision is the cause of my lost sewjo. I am always juggling so many projects that I can feel a little burnt out. I knew I had a project tour coming up for it, but just couldn't find the right project.
When organizing my fabric I found the fabrics I had received and thought a long time about what pattern was perfect. Endless scrolling on Instagram and Pinterest came up with very little. The fabrics are so cute, and I love that the prints feature an inclusive and expansive community on them, so I knew I didn't want to cut them up too small.
I ended up settling on a simple patchwork design. I used a total of (64) 6" squares from a total of 22 fat quarters. I cut (1) 6" WOF from each fat quarter, paying attention to directional prints and cutting along the length of fabric when needed to preserve the print. Then sub-cut (3) 6" squares from that.
I replaced, 6 squares with heart shaped blocks using Cluck Cluck Sews Pattern 4" (actually 4.5” unfinished) heart block pattern. I added an additional (2) 1.25"x4.5" to the top and bottom of my heart block and then (2) 1.25"x6" background fabrics to the right and left of my heart block to create a 6"x6" block.
I pieced the quilt in columns and pressed odd columns up and even column seams down, so the seams would lock. I basted and free motion quilted it. I am still trying to get better at this :) .
These are the Pom Poms I used. This is an affiliate link and if you purchase pom poms through this link I may receive a small portion from the sale.
Didn't the quilt turn out terrific? Just the right amount of flair and a new technique for adding flair to the binding that broke me right out of my sewing rut!
I used a simple white background from Riley Blake's Basic collection by Chris the Tattooed Quilter called Blossoms in white.
Check out my sweet Millie girl and my Jibberwhopper boy enjoying the quilt on a lazy Sunday.
Some of these links may contain affiliate links in; which I may receive payment if you follow my link to purchase. I have and will only recommend products that I have used and genuinely like.
Trimming blocks, specifically half square triangles (HSTs) is a basic quilting skill, that will level up your piecing game. By trimming the HSTs to a uniform size, in our case 4.5", we reduce the likely hood of having blocks that are slightly too big or small, causing inaccurate piecing. We will discuss a few methods for trimming HSTs below. Let's talk tips first though.
Trimming Tips
Let's talk posture first. Why? Well poor posture can cause you to hate trimming. I recommend standing with your rotating cutting mat placed on a sturdy surface at your hips height. This will help reduce strain from the constant cutting motion with your rotary and help your back survive long spouts of trimming. I trim on our kitchen island.
Use a fresh rotary blade. Dull blades can cause inaccurate trimming and forearm strain that can lead to damage such as carpel tunnel! Yikes!
Stand comfortably with your knees unlocked.
Take frequent breaks to once again reduce wrist strain and fatigue. I often leave my blocks on the kitchen island and put my rotary cutter in an area unreachable by my preschooler and come back to it when I have breaks in the day. You'd be surprised how quickly trimming goes when you do it in batches like this.
Happy Trimming!
Methods
Since the supplies vary each method, we will have a supply list included per method.
Clearly Perfect Slotted Trimmers
Supplies
These are the supplies I use/prefer.
Clearly Slotted Perfect Ruler
Self Healing Cutting Mat
Line up the trim size with your sewn seam. Trim each side. Trim in the dog ears slot to remove the dog ears.Press to preference. Set aside for block construction.
I prefer to use a 28 mm rotary cutter for trimming small blocks like this. I feel like it provides more accuracy and comfort when trimming.
Press your half square triangles (HSTs) to preference. Use an appropriate sized ruler. I recommend using a 6.5" x 6.5" square ruler for our 4.5" HSTs. Center your ruler diagonal on the HST diagonal, so you have excess HST on the outside of your trim size.For example,I have excess HST on the outside of the 4.5” markings on all sides.Trim the side and top. Rotate yourHST 180 degrees. Now you will line up your trimmed HST on your 4.5” mark, so the untrimmed excess is on the outside of the ruler to trim.Trim both the side and top. Set aside for block construction.
Rotating Cutting Mat + Trim Sized Ruler
Supplies
Rotating Cutting Mat
I prefer the larger 14" mat because I work with large HSTs too. If you only work with small HSTs (8" or less) there is a smaller mat linked second that is perfect for the 4.5" HSTs we are trimming.
I prefer to use a 28 mm rotary cutter for trimming small blocks like this. I feel like it provides more accuracy and comfort when trimming. Press your half square triangles (HSTs) to preference. Use a ruler that is the exact size you need to trim to. For example I am using a 4.5” ruler to trim to 4.5”. Center your ruler diagonal on the HST diagonal, so you have excess HST on the outside of all sides of your ruler.Trim the side and top. Rotate your mat 180 degrees.Trim both the side and top again.
Happy Trimming!
Questions or comments please email me at squatsandrunningstitches@gmail.com
]]>
https://squatsandrunningstitches.com/blogs/news/entropy-scrap-along-week-3-sept-5-11-piece-half-square-triangles2021-09-04T12:10:41-06:002021-09-04T12:10:41-06:00Entropy Scrap Along - Week 3 (Sept. 5-11) - Piece Half Square TrianglesSummer Davis
Are you all ready to actually sew something?
Yep! We've finally made it to the point where we get to use our sewing machines. First we will be pairing all of our fabrics together with a corresponding square of the same size. These squares will become an HST unit, so I recommend making sure they have contrast between them. For my "super scrappy" inverse entropy quilt, I paired all of my colored squares with a low volume square.
What's low volume mean Summer? Well its basically any fabric that is white or cream fabrics with prints, that read as a single color from afar. Check out the close up photo of my block below and then the picture further out. Can you see how the print on the white fabric is almost unnoticeable with distance?
We will mark the "lighter" colored square of our paired squares. To do this I recommend using a frixion pen because we will be cutting on these marked lines we don't have to worry about it showing up on our fabrics later. If you are using mostly dark fabrics, I recommend marking with a Hera marker.
Below we will mark and sew our squares to create half square triangles (HSTs). All methods use a scant 1/4" seam allowance. This is important because these square sizes are "tight". That means that a larger seam allowance than a 1/4" will cause your half square triangles to be less than the desired 4.5". If you haven't found your scant 1/4" yet please watch this video and find it before beginning to sew.
Disclaimer!
The pattern and the scrap along square sizes vary. Don't be confused by this! The pattern uses 5.25" squares and 10.25" squares, the scrap along uses 5" and 10" squares to accommodate precuts. Despite the size difference the methods are the same for all sizes.
Note: If you are using a clearly slotted trimming ruler you will skip pressing your block open until after trimming; which is allotted for in the next two weeks (Sep. 12-18 & Sept 19-25).
A few tips for staying organized while piecing.
1. Piece your blocks in batches of colors. What do I mean by this? For example, chain piece all of yourblueblocks together, and then cut, stack, and press. Then repeat, with red, orangeandyellow. This will keep your colors organized and reduce time spent reorganizing by color.
2. Pin your squares together to reduce the blocks from slipping out of alignment with one another while sewing. If blocks aren't lined up, you will have issues with block size and we don't want that!
5" or 5.25" Squares - 2 at a time HST Method
7.25" Squares (scrap version only)- 4 at a time HST Method
This method cuts the HSTs on the bias. Why should you care? Being cut on the bias can cause them to stretch and become misshapen, but we can avoid this! Press the seams gently and use a dry iron when pressing them.
10" or 10.25" Squares - 8 at a time HST Method
Half Square Triangle Blocks
The blocks should come out slightly larger than 4.5". In order to ensure our blocks are uniform and create a beautifully pieced quilt, we will be trimming each block. We will explore the various trimming methods in the following week.
Let's Review Our Week 3 Goals
1. Pair all of our squares together.
2. Piece all of our squares to create half square triangle units.
3. Press all blocks using preferred pressing method, unless using a clearly slotted ruler to trim.
So you have your scraps and fat quarters cut or you're working with charm packs or layer cakes and you want it to look modern and fresh and use additional yardage your for quilt? No problem!
To determine the additional yardage you will need, use the following excel worksheet (click here) to determine how much you need. This work sheet even tells you how many WOF (width of fabric) to cut from your yardage and how many squares from total. Here are the cutting diagrams for the following pieces based on a standard 42" WOF. As you can see you can get (4) 10" squares from a 10" WOF, (5) 7.25" squares from a 7.25" WOF, (8) 5" squares from a 5" WOF, and (9) 4.5" squares from a 4.5" WOF.
Check out this video that explains how to use the excel spreadsheet. Also if you don't have access to excel, feel free to email me at squatsandrunningstitches@gmail.com and will generate your yardage for you!
]]>
https://squatsandrunningstitches.com/blogs/news/entropy-scrap-along-week-12021-08-22T03:32:40-06:002021-08-27T20:21:15-06:00Entropy Scrap Along- Scrap Busting - Week 1 & 2 (August 22- September 4th)Summer Davis
This week we will be choosing our fabrics for our Entropy Scrap Along! The modified pattern uses the following scrap sizes: 4.5", 5", 7.25", & 10" squares to make background squares and half square triangles. To quickly sort your scraps into usable scraps that can be cut down to the following sizes follow these tips. Click Here for the printable templates and labels.
Print off the labels and attach to containers. Boxes, baskets, sacks and mini totes work great. Don't forget to add a discard container (label not included) to save the scraps that won't work for this project for another.
Print off the size templates to quickly sort scraps into the correct sized bins.
Use the templates to make sure the scrap is usable. The scrap needs to be larger than the template, if there is any question or if it is a hair too small, put it in the size below.
The above picture shows a scrap that almost works, but is slightly too small and should be placed in the size below scrap bin, while the bottom scrap picture shows a scrap with enough allowance on each side to cut down to a 5" square.
After you have sorted your scraps, we will start to build a color story. I use the saying ROYGBIV (red, orange, yellow, green, blue, indigo and violet) to help me sort my colors without having to think about it too much. I usually include browns with the oranges. I make two additional piles for white/cream/light fabrics and for darker prints that are mostly black in color. Do this for each bin of fabrics.
As you are sorting and building a color story, if there are fabrics that you just don't like, feel free to pull it out and add it to your discard pile. After you cut the fabrics into the appropriate sizes and determine how many half square triangles you can make, you can add additional yardage to enhance your color story or add additional length/width.
Now to decide if you plan to use additional yardage or scraps to create half square triangle units. After cutting our scraps to size we can decide.
]]>
https://squatsandrunningstitches.com/blogs/news/entropy-scrap-along-precuts-and-cutting-scraps2021-08-22T02:59:46-06:002021-09-02T09:47:42-06:00Entropy Scrap Along - Precuts- Week 1 & 2 (August 22- September 4th)Summer Davis
Are you here because you have a stash overflowing with precuts? All of those fat quarter bundles and layer cakes that were just too cute, not to buy? Same!
My stash is currently overflowing with a lot of fat quarter bundles I couldn't resist, but how about we use some of those!
This scrap along uses various methods for HST construction, so we can use up different precuts for different methods. These methods include 2-at-a-time half square triangles, 4-at-a-time half square triangles and 8-at-a-time half square triangles.
An Entropy block requires12 half square triangles and 4 background squares.
You can choose to do a "normal" entropy quilt block seen below, to the left, where the half square triangle color is oriented inwards, and the background squares are a single color oriented outward. The other option is what will be referred to as an "inverse" entropy quilt block, where the color that contrasts more is facing outward and the background squares are multi-colored and face inward.
For 2-at-time HSTs (half square triangles), we will use 5" squares, which happens to be the same size as a the fabrics in a charm pack.
By just using a charm pack, and matching them with one another in the pack we can create a total of 42" half square triangles. Each Entropy block requires 12 HSTs, so if we were to add an additional 6 HSTs and 16 background squares, we can use up an entire charm pack and make a 36"x36" quilt.
You can also use yardage or other fabrics you have in your stash as background fabrics and cut (42) 5" background fabrics to pair with your charm pack fabrics and make a total of (7) Entropy quilt blocks. Want to make a 64"x64" quilt with just a charm pack and background yardage? This version is a cool modern option! The fabric requirements for this version is one charm pack (42) squares, and 4 yards of white (background color). You'll cut (28) 4.5" squares, (9) 16.5" squares, and (42) 5" squares from your background color to make this version.
Layer Cakes (10"x10")
For 10" squares we will use the 8-at-at-time method. If you are using a layer cake with (42) 10" squares, you can choose to match 28 of them with one another in the pack we can create a total of 108" half square triangles. Each Entropy block requires 12 HSTs and 4 background squares. We can use 9 layer cake squares to create 36 background squares and We can make a total of 9 Entropy blocks.
You can also use yardage or other fabrics you have in your stash as background fabrics. Cut (24) 10" background fabrics to pair with (24) 10" fabrics from your charm pack to make a total of 192 HSTs. Use 16 of the 18 remaining 10" layer cake squares as background squares. This will create 16 Entropy blocks and 64"x64" throw.
You'll need 2 3/4 yards of additional background fabrics to make the above version.
Fat Eighths (9"x22")
You can break down a fat eighth into (3) 7.25" squares. You can combine these squares with an accompanying 7.25" square to make 4 HSTs per 2 squares. Two fat eighths can create a total of 12 HSTs. You could use (16) fat eighths, subcut (48) 7.25" squares to make the following Entropy quilt version. To make the version below using 16 colored fat eighths, you will need an additional 3 1/4 yards fabric.
Fat Quarters (18"x22")
You can break down a fat quarter into a few different sub-cuts. You can choose to use 8-16 fat quarters with additional yardage for a throw sized quilt.
Here are some possibilities with fat quarters.
Fat Quarters (normal 16 FQs)
Fabric Requirements: 16 FQs, and 2 3/4 yards of background.
Fat Quarter (normal 12 FQs)
Fabric Requirements: 8 FQs, and 2 3/4 yards of background.
Fat Quarter (Inverse 12 FQs) Option 1
Fat Quarter (Inverse 12 FQs) Option 2
Both inverse options need an additional (16) 4.5" squares and 2 yards of background fabric.
Fat Quarters (Inverse 16 FQs)
Fabric Requirements: 16 FQs, and 1 3/4 yards of background.
]]>
https://squatsandrunningstitches.com/blogs/news/entropy-scrap-aong-cutting-week-12021-08-22T02:59:25-06:002021-08-30T09:21:51-06:00Entropy Scrap Along - Cutting- Week 1 & 2 (August 22- September 4th)Summer Davis
Let's break down an Entropy Block first
An Entropy block requires12 half square triangles and 4 background squares.
There are three options to building an entropy block, Super scrappy, normal, or inverse. Each option will be described below.
Super Scrappy
Uses scraps and mismatched fabrics for all units. You will base the number of blocks you can make on the amount of scraps you have instead of using additional yardage.
Normal and Inverse Entropy Block
You can choose to do a "normal" entropy quilt block seen below, to the left, where the half square triangle color is oriented inwards, and the background squares are a single color oriented outward. The other option is what will be referred to as an "inverse" entropy quilt block, where the color that contrasts more is facing outward and the background squares are colored.
Cutting
So you've already sorted out the usable scraps or you've picked the precuts you want to use and now you are ready to cut your fabrics into usable squares. (Continue to scroll to Precuts if that is what you are using)
Using Scraps?
Start by working one container at a time. First, start with your scraps you will be cutting down to 5" squares, then 7.25" squares and then your 10" squares. While cutting these scraps, accuracy in cutting the squares will help ensure the units come out to the correct size of 4.5" squares when sewn together and cut.
You can use a large 12.5" x12.5" ruler to cut all of the required squares. One way I like to improve my accuracy as well as cut down on my cutting time is by marking my ruler with Washi Tape like below.
If you look closely at the picture below, you can see that I put the tape on the outside of the line that marks 5". This helps ensure that I get a full 5" square with a scant extra when ever I am cutting to size. I recommend doing the same when cutting the 7.25" and 10" squares.
Check out this video to see how I trim them one at a time.
If you have a rotating cutting mat, you can stack and whack scraps accurately by doing the following!
So you've finished cutting?
Now you will need to determine the amount of squares you have of each size (4.5",5",7.25", & 10"). I suggest writing these numbers down. If you haven't already decided, you will need to determined if you will make "Super scrappy", "normal", or "inverse" entropy blocks. The normal and inverse use additional yardage to create half square triangles while the super scrappy pairs scraps together. For each half square method, we need two squares of the same size, regardless of method.
Super Scrappy Version
To determine how many half squares triangles you can make by pairing the scrap squares together, count the amount of 5" squares, 7.25" squares, and 10" squares.
Use the following equation, and be sure to round down to the nearest even number before hand. So if I have (67) 5" squares, you will round down to (66) 5" squares.
In the equation, x=the amount of 5" squares you have, y= the amount of 7.25" squares and z=the amount of 10" squares you have to determine how many.
(x)+(y2)+(z*4)=Amount of HSTs
To find out how many blocks you can make divide the amount of HSTs by 12.
HSTs/12=blocks
Then to find out how many 4.5" squares you need, multiply the amount of blocks by 4.
blocks x 4= amount of 4.5" squares.
For example, if I have (62) 5" squares, (7) 7.25" squares, & (6) 10" squares I would round the (7) 7.25" squares down to (6) and I would have a total of (62)+(6*2)+(6*4)= 98 HSTs
To find how many blocks I can make with that amount of HSTs, I divide 98/12=8.1, rounded down =8 blocks.
For 8 blocks, I need (4) 4.5" squares per block, so 8*4= 32
I need (32) 4.5" squares for my 8 blocks.
Use the excel spreadsheet and input your numbers in the cells marked yellow to have the worksheet output the above numbers for you.Click Here.
Scraps & Yardage
If you will be using yardage instead of scraps, you will still need to know how many HSTs you can make from your scraps, but the equation will be as following:
(x2)+(y4)+(z*8)=Amount of HSTs
To find out how many blocks you can make divide the total amount of HSTs by 12.
HSTs/12=blocks
Then to find out how many 4.5" squares you need, multiply the amount of blocks by 4.
blocks x 4= amount of 4.5" squares.
To determine how much fabric you will need to supplement for yardage you can use the following equation. It assumes you are using 42" WOF.
You can use the included excel spread sheet to calculate yardage for you. Just fill in the cells marked in yellow. Click here.
Inverse Entropy Block Yardage Calculation
((x/8)*5)+((y/5)*7.25)+((z/4)*10)= y
Now that you know how many HSTs you have and how much additional yardage you will need. You can start planning your quilt layout with the following coloring sheet or you can wait until you have made your HSTs.
Using Precuts
If you are using precuts, you need to decide; what your cutting plan is.
Charm Packs (5") & Layer Cakes (10")
The charm packs (5") are easy and you can use them for 2-at-a-time HST construction, no extra cutting necessary. The same can be said for 10" layer cakes, which will be used for 8-at-a-time half square triangles. Now for fat eighths and fat quarters you will need to cut them down into 5", 7.25" and 10" sub-cuts.
Fat Eighths (9"x22")
Below is the suggested way to cut a fat eighth; which measures 9"x22".
As you can see above, you can get (3) 7.25" squares out of a fat eighth, which translates into the possibility of 12 HSTs if you pair them with additional yardage.
Fat Quarters (18"x22")
Since Fat quarters are larger cuts, we are able to get a lot more sub-cuts out of them. You can choose to use as little or as much of each fat quarter as you like. Here are some cutting suggestions. Also if you prefer 2-at-a-time HSTs instead of 8-at-a-time, you can substitute any 10" square for (4) 5" squares to make the same amount of half square triangles.
At the top, you can see that it is labeled FQ Inverse and uses 12 FQs to make a throw size quilt. This assumes that you pair each 10" square from the fat quarters with background fabric. You would need 1 3/4 yards of additional fabric to cut (24) 10" background squares and 16 additional 4.5" colored squares.
At the top, you can see that it is labeled FQ normal and 16 FQs are needed to make a throw size quilt. This assumes that you pair each 10" square from the fat quarters with background fabric. You would need 3 yards of additional fabric to make this version and would cut (64) 4.5" squares, (16) 10" squares and (32) 5" squares from the additional yardage.
At the top, you can see that it is labeled FQ normal and 8 FQs are needed to make a throw size quilt. This assumes that you pair each 10" square from the fat quarters with background fabric. You would need 3 yards of additional fabric to make this version and would cut from the background fabric (16) 10" squares, (32) 5" squares and (64) 4.5" squares.
Calculating additional yardage
To calculate additional yardage use the excel spread sheet here.
Enter the amount of 5", 7.25", and 10" squares you have. The spread sheet will calculate the additional yardage you will need. This yardage will vary based on if you are doing the "normal" layout or the "inverse" layout as previously discussed. The "normal" layout uses the same background color for the 4.5" squares; while the "inverse" layout uses colored squares for the 4.5" squares and does not need to be calculated as additional yardage. I recommend adding an extra yard to the calculated yardage for safety, since this is a scrap along and its not so clear cut to calculate.
Need Additional Help?
Email me at squatsandrunningstitches@gmail.com
]]>
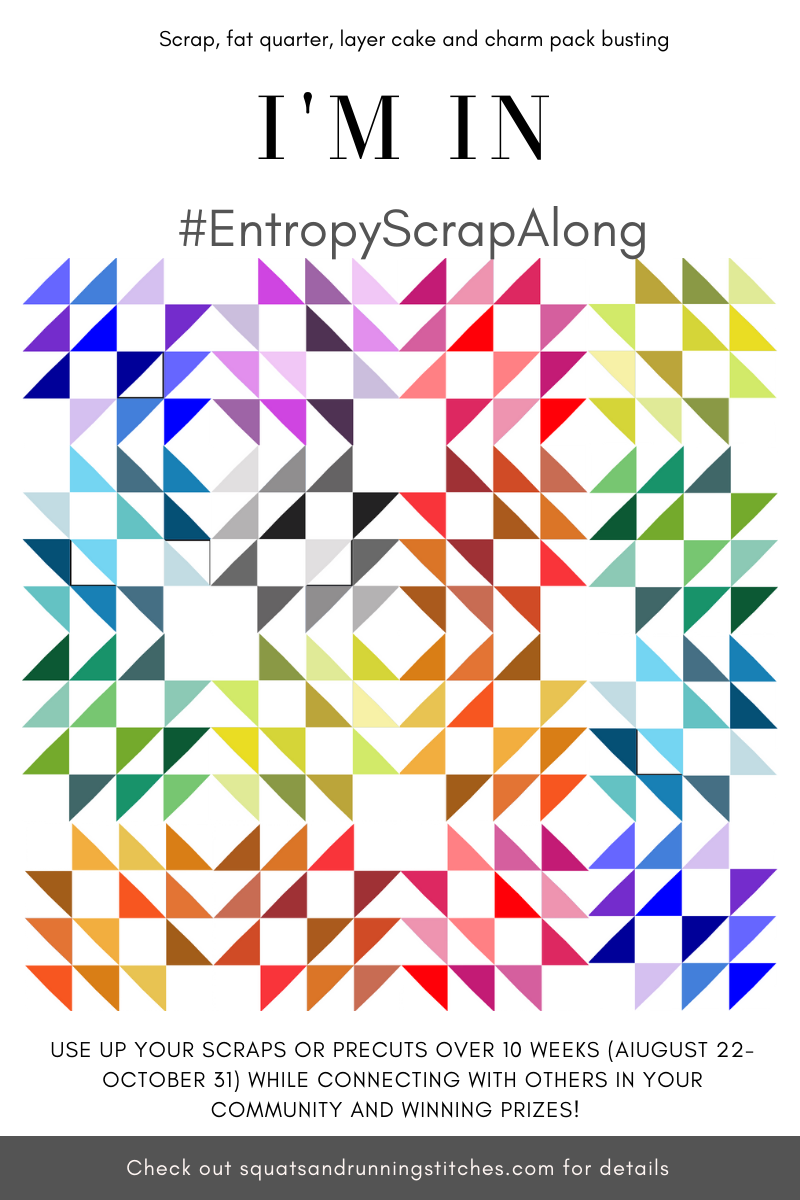
https://squatsandrunningstitches.com/blogs/news/entropy-scrap-along2021-08-20T16:01:24-06:002021-08-22T11:40:55-06:00ENTROPY SCRAP ALONGSummer Davis Share the graphic below to your Instagram feed to be entered into a special participation giveaway!
The Entropy scrap along is about to begin and I am so excited you are here! This will be a fun, slow paced sew along focused on busting scraps and pre-cuts!
During this community sew along we will make an Entropy quilt. Based on the size of your scraps, your quilt size will vary between 32" square - 64" square, but of course don't let my suggested size stop you! Feel free to add borders to add area to your quilt.
How does the sew along work? Anyone who would like to participate is welcome to join! I will give directions for charm packs, layer cakes, fat quarters and scraps! I even recommend using a few jelly roll strips for 2.5" binding strips to help bust those rolls.
It is not necessary to purchase the Entropy quilt pattern in order to participate, as this will be modified to bust scraps and other precuts, but I do always appreciate your support! You can buy the pattern and use one of its versions and join us on this quilt along, I just won't be offering any of the versions in the pattern free on here except the Fat Quarter option.
Here is a coloring sheet to help plan yours if you already know what precuts you will be using. click here.
Curious about the time frame? I have the sew along planned for 10 weeks (August 22-October 31) of scr-happy fun! When doing research for this sew along, the biggest complain was that it wasn't easy for people who work to keep up, so I specifically added catch up weeks to account for this! If you don't need the extra weeks, use that time to rest or catch up on other projects! Check out the schedule below.
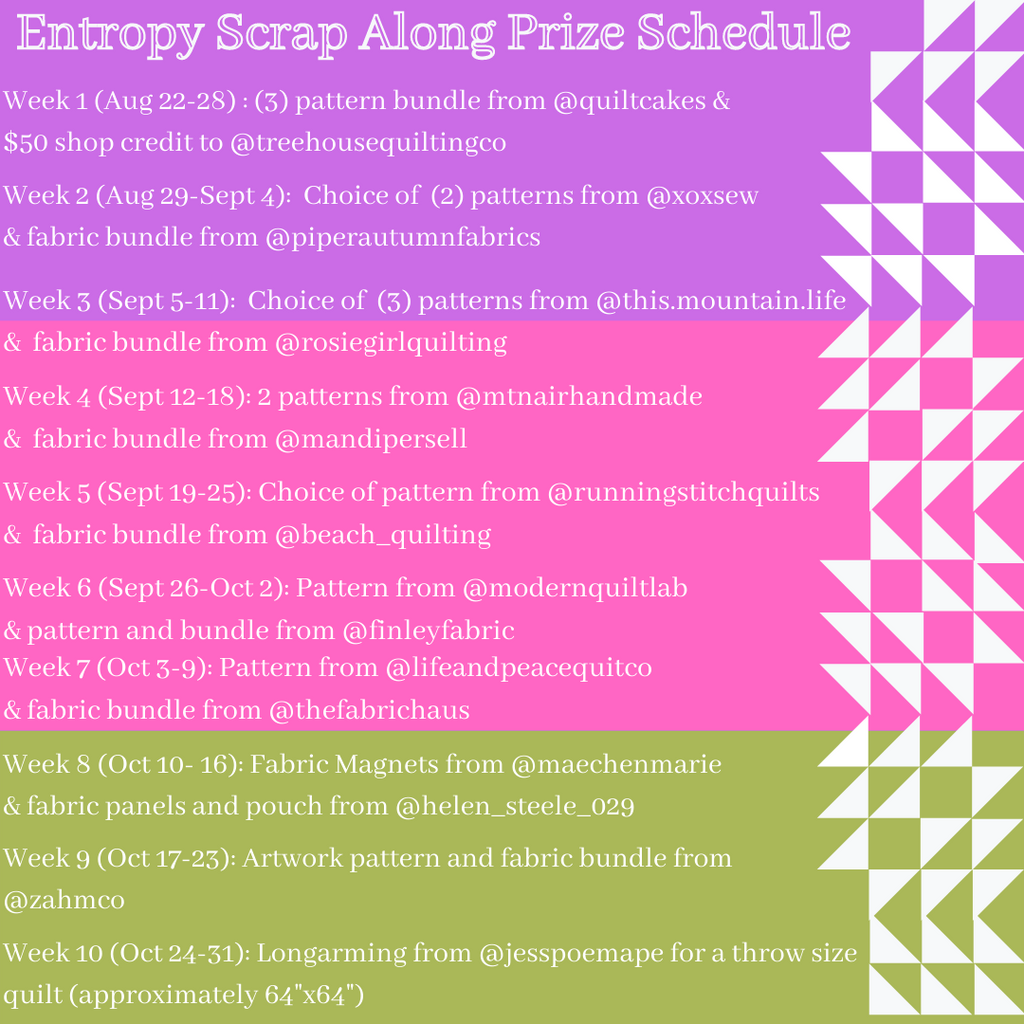
And of course! Our wonderful quilt community has come together to sponsor weekly prizes for the participants! Check out our sponsors and be sure to return their kindness with a follow!
In order to be eligible for the following prizes, I ask that you post on Instagram and share a picture of your interpretation of the following prompt during the requested week. I also ask that in response to our sponsors kindness you give them a follow during the week they are sponsoring.
Thank you so much for joining me and I can't wait to sew this quilt with you all!
]]>
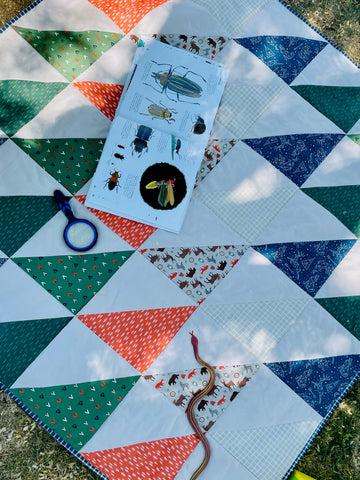
https://squatsandrunningstitches.com/blogs/news/the-perfect-childrens-adventure-fabric2021-06-06T14:57:28-06:002021-06-06T14:57:28-06:00The Perfect Children's Adventure FabricSummer Davis
It's finally a summer filled with the possibility of adventure and I found the perfect fabric for my wild child. It's called "Adventure is Calling" by Dani Mogstad for Riley Blake Designs.
It has plaid, the cutest tree print, tents, constellations and wild animals. I think they checked all the boxes for an adventure fabric line that's perfect for a project I have been avoiding. A quilted sleeping bag!
I've been yearning to make a quilted sleeping bag for some time now, my husband has asked me numerous times to try my hand at making him one. He and our child are both ovens, and for the most part, a quilt is the perfect layer for our camping adventures (usually in a camper). So the goal was to create a sleeping bag that can go outside (not too pretty, where I never let my family use it because I do that) , but also be used inside to pretend to camp on days I am stuck inside and my child needs a little adventure for his restless heart.
Using simple half square triangle blocks, I created a 54" x54" quilt top. I basted & quilted as normal.
Then using a curve template I curved the corners on all edges of the quilt. Why did I do this? Well I figured, it'd be much easier to add a zipper to a curved edge than try to fight with a zipper at a 90 degree angle.
After trimming my corners to curves, I proceeded to make my binding. I choose a wider binding 2.5" so it would look better once I added a zipper. What a feat adding that zipper was tough!
I added the binding to the front of the quilt, and then gently matching the binding and the curve of the quilt once reaching the corners. I finished the binding by stitching in the ditch. I then added the zipper. Ugh, twice. Yep, I did it completely backwards the first time. Also I should add, I was doing this at 2 AM, so my thought process was at 25% capacity, but I digress.
Was it worth it? I'd say so! It fits perfectly in our kiddo's room and backyard. The prints are fantastic for children who love all things adventure and a great combo of unisex colors.
]]>
https://squatsandrunningstitches.com/blogs/news/traditional-quilt-modern-flair2021-04-12T22:49:43-06:002021-04-13T08:13:33-06:00Traditional Quilt, Modern FlairSummer DavisMore]]>
Are you looking for a way to make an otherwise traditional quilt pattern modern? Well a color fade and rounded corners just might be the flair you are looking for.
Using Lo & Behold Stitchery’s reworked “Celtic Crossing” pattern, the ombré version, and a paper plate, I was able to take this otherwise traditional pattern and make it completely fabulous using Bee Cross Stitch fabrics. I owe Lori Holt and Riley Blake Designs the biggest high fives for these fabrics because they knocked it out of the park. I am a solids girl at heart, but felt right at home using these babies and the extra bit of texture of the patterned fabric is just the sugar on top.
Now how did I do it? Well a small plate did the trick. A random paper plate from a superhero themed bash at approximately 7” diameter saved the day. How fitting right? But almost any plate will work as long as its a circular.
First, line the plate up with the sides touching both the vertical and horizontal edge of the quilt as shown.
Using a marker, (Frixion, disappearing or Hera marker are all great options), mark around the plate as shown.
Using a rotary cutter or scissors trim on the marked line to produce a rounded edge.
Next, binding time! Now you are probably thinking this is the “tricky” part, but its relatively easy if you go slow, I promise! Make binding as normal and begin attaching as you normally would until you reach the beginning of the curved corner. Slowly match your binding curve to your quilt curve about a 1/2” at a time, following the gentle curve of your quilt.
Repeat, until you make your way around the curve and hit the straight edge of your quilt again. Do this on each upcoming curve and finish binding by attaching to the back using your preferred method of finishing. I prefer to stitch in the ditch, which is how I finished this one, but if you prefer to finish by hand, that’s cool too!
What else is cool? Or for a better description cold, was this photo shoot in the wild, but dang it was worth it.
]]>
https://squatsandrunningstitches.com/blogs/news/it-s-a-quilt-it-s-a-pillow-it-s-a-quillow2021-03-30T21:16:18-06:002021-04-01T07:39:39-06:00It’s a Quilt, It’s a Pillow, It’s a QuillowSummer Davis
Have you been looking for something a little different to do with your quilt than the super popular quilt coat? Well let me introduce you to the quillow. It’s a quilt with a pouch that folds up into a tidy pillow; which makes it great for traveling or decluttering your living space.
Using the new Camp Woodland fabric by Natalia Juan Abello for Riley Blake Designs (pictured below) I made considerably the cutest travel quillow for my kid.
Below is a preview of what the quillow looks like when it is folded into the pillow option.
And here is what the actual throw quilt looks like. Isn’t this quilt just stunning? Thanks to Penelope Handmade for making the Ebb and Flow Quilt Pattern; which is great for showing off prints.
Now to get to the nitty gritty, how does one make a “quillow”? Well technically you could take any finished quilt and make it into a quillow, neat I know! Step one, make a quilt, any pattern will do, but preferably a quilt that is either 48” or 54” to make a 16” or 18” square. If it’s not that size don’t worry, you can still make a quillow. To determine how large your quillow will be and what size of pouch to make take your quilt width and divide by 3. Ex. 54”/3=18” pillow. Here’s my finished Ebb and Flow Quilt.
Now that you’ve made a quilt, we need to make the quilted pouch portion of the quillow. In order to do this, we will make a pieced or whole cloth mini quilt. This will be the pillow front, so lets make it pretty. You can see in my example I used leftover pieces from my Ebb and Flow Quilt to create a 19”x21” oversized pieced top.
I then basted and quilted to preference as shown below.
Since my pieced pouch top was a little large, I trimmed it down to 18” square to scale my throw size Ebb and Flow quilt (54”).
The next step is to finish the pouch by using your preferred method of binding.
Now that we have both a throw quilt and a mini quilt, we can attach it, so the quilt folds into a pillow. Turn over your quilt, so the backing is right side up.
Determine which side you would like to be the top or bottom. Using a disappearing marker or a Hera marker, mark the middle of your quilt above the binding and then another mark the amount of your pouch size, mine is 18” for example.
Next, mark the middle of your mini quilt. Lay your mini quilt right side up so the decorative side is seen aligning the marks with the marks on the quilt. Baste using your preferred method of basting. I prefer to baste using Elmer’s Glue.
We are so close! Now that your pouch is basted into place we will use invisible thread in our bobbin, Superior Threads monofilament, is my preferred thread brand and stitch the mini quilt to the larger quilts back. We will start on the top right corner as shown, and go 3/4 way around to the top left corner, and then stop, secure the stitch and come back the same 3/4 by stitching in the binding ditch. I prefer to use a walking foot for this part. Be extremely careful not to stitch across the top of our mini quilt to ensure we have a pouch when we are done not a patch.
Now what? Well now you have a quillow, but I am sure you are asking how to fold it, so lets do that. You will lay your throw quilt with your top facing up.
You will continue by folding 1/3 width of your quilt inward and then doing the other side the same to make a long fold that is your throw quilts height and your mini quilts width.
Now fold your quilt towards your pouch about two equal folds so it is the same size as your pouch and stuff that baby into your pouch. Now you have a quillow. Both equal parts elegance and bomb dot com.
Now for more pictures of this adorable quilt in the wild.


 Oh
Oh


 Using a marker, (Frixion, disappearing or Hera marker are all great options), mark around the plate as shown.


